Showing posts with label desk makeover. Show all posts

Monday, October 10, 2016

Desk Makeover - Again

Last week, I shared my makeover of my previous furniture make over fail. Now I'm back to share how I fixed the once beautiful green desk.

Of all the three furniture fails, I was most upset about the desk. The mint green was so pretty that I had used it on my corner cabinets. I had no more Spirited Green by Sherwin Williams so I went back to the store. The color was nowhere to be found in their samples but I found pretty much what I thought was an exact match. The problem was, Sherwin Williams only does their most expensive paints in quarts and it was about $25 for a quart on sale. I couldn't spend that much money on a quart (especially considering I was going to get two colors, primer, and polyurethane). So, I headed to Home Depot where I got a quart for about half the price.

Here's what I used:
  • Kilz original oil based primer
  • Behr Premium Plus Ultra Interior Satin Enamel in Shanghai Jade 
  • Varathane No Odor Interior Water Based Polyurethane Satin Crystal Clear (ordered on Amazon)
I sanded the desk down lightly, did one coat of primer and two coats of Shanghai Jade. I put three coats of polyurethane on the top.

Ta-da!


As a reminder, here is what it looked like all yellowed.


While Shanghai Jade isn't exactly the same as Spirited Green, they're pretty close! Here is what it looked like before the polyurethane had turned yellow.


A pretty good match!
 

Here is what the desk looked like before it was made over the first time.

Here is the desk with my newly reupholstered dining room chairs.


Now, this is a piece of furniture I'm happy to look at again!


Wednesday, May 1, 2013

Desk Makeover

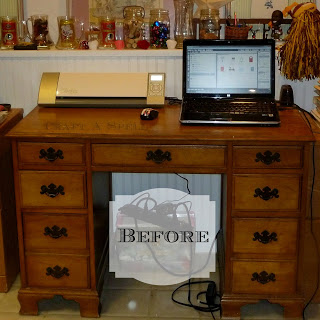
My apartment comes with a craft nook. Okay, so it's not exactly labeled that on the floor plan but it's a nook and I plan on doing my crafting there. I was planning on trying to maybe make a desk of some sort. I had a craft desk that I had been using but it was my dad's school desk growing up and he was very attached to it. I didn't think he'd let me take it, nevertheless change it in anyway. But he finally caved. Here's what it looked like before:


That doesn't look too bad, right? Well, that's probably because my Cameo and laptop are positioned perfectly so you can't see the bad parts on the top.


It came complete with water stains, crust, gouges, and part of the top had peeled off. My dad, kindly, came to the rescue. Since I was so busy with other things, he sanded it for me and glued the legs back together since they had come apart a bit.


He used some wood putty to fill in some of the gouges. It was okay to use, he said, even though it was for our wood floors, since I was going to paint it (it wouldn't have worked if I had wanted to stain it). Here is a close up of the fixed top.


Here is the original hardware before painting. It's the rounder of the two (the pointier ones go with another piece I'll be sharing later). These handles weren't going to come apart so I stuck a toothpick in the side so they could get coated all around.


Here is what I used:

-Primer: Kilz
-Color: Sherwin Williams Spirited Green in semi-gloss (2 coats)
-Polyurethane: Minwax in Clear Gloss (2 coats)
-Hardware: Krylon Oil Rubbed Bronze

My dad just about died when I told him I wanted to paint it green. It went something like...

Me: "I'm going to paint the desk green."
Dad: "Green? GREEN? Really?!"
Me: "Like a mint green. It's so in right now. Green is your favorite color."
Dad: "Can't you just restain it or something? This was the desk I grew up with! I did my homework there."
Me: "I KNOW. But really, Dad? Have you SEEN the desk?"

Yeah. Well, guess what. It's my desk now! I can paint it whatever I want. And I chose this beautiful, delicious, soft minty green.


I am so in love with this desk. Really, the pictures do not do the color justice. It is awesome. And best of all...Dad approves.


With a piece like this, you definitely need to do a polyurethane-type protective coating (I kind of sound like I know what I'm talking about!). I'm going to be doing all sorts of painting and crafting here so I wanted to protect the surface.


Here is a close up of the hardware. The color isn't really right in this picture. It's much more like the yumminess in the picture above.


Here's a reminder of the before and after:


I love it! I'm wondering what else I can paint with this beautiful green!

This post was kindly featured at: