Thursday, October 13, 2016

Sidetable Makeover - Again

Today I'm sharing the last in my series of furniture re-makeovers. If you're just joining us, I had a refinishing fail and re-did my nightstands and desk. Now I'm going to show you my side tables which I think made the biggest transformation.

Here's what I used:
  • Kilz original oil based primer
  • Behr Premium Plus Ultra Interior Satin Enamel in Mystic Turquoise 
  • Varathane No Odor Interior Water Based Polyurethane Satin Crystal Clear (ordered on Amazon)
As with my previous pieces, I sanded down the tables lightly and put a coat of primer and three coats of Mystic Turquoise. Here is a picture of them with their paint during my binge watch of Gilmore Girls (trying to get ready for the new season coming out in November!). It was very crowded in here for about three weeks!


I thought the tables were too boring just painted. So, I broke out a stencil I had won in a giveaway a few years back but was too intimidated to ever use - the Gabrielle Damask Stencil from Cutting Edge Stencils.

I sponged it on using a combination of Martha Stewart metallic silver paints including sterling and pewter to create a unique two-toned look.


I'm really happy with how it came out.


Especially when it used to look like this.


I coated the top with three layers of polyurethane after I was finished.


Remember, it used to look like this many moons ago.


The new stenciled top is much better than a hundred tiny screaming faces, don't you think?


Yeah, I'm pretty sure no one can argue with that.


Monday, October 10, 2016

Desk Makeover - Again

Last week, I shared my makeover of my previous furniture make over fail. Now I'm back to share how I fixed the once beautiful green desk.

Of all the three furniture fails, I was most upset about the desk. The mint green was so pretty that I had used it on my corner cabinets. I had no more Spirited Green by Sherwin Williams so I went back to the store. The color was nowhere to be found in their samples but I found pretty much what I thought was an exact match. The problem was, Sherwin Williams only does their most expensive paints in quarts and it was about $25 for a quart on sale. I couldn't spend that much money on a quart (especially considering I was going to get two colors, primer, and polyurethane). So, I headed to Home Depot where I got a quart for about half the price.

Here's what I used:
  • Kilz original oil based primer
  • Behr Premium Plus Ultra Interior Satin Enamel in Shanghai Jade 
  • Varathane No Odor Interior Water Based Polyurethane Satin Crystal Clear (ordered on Amazon)
I sanded the desk down lightly, did one coat of primer and two coats of Shanghai Jade. I put three coats of polyurethane on the top.

Ta-da!


As a reminder, here is what it looked like all yellowed.


While Shanghai Jade isn't exactly the same as Spirited Green, they're pretty close! Here is what it looked like before the polyurethane had turned yellow.


A pretty good match!
 

Here is what the desk looked like before it was made over the first time.


Here is the desk with my newly reupholstered dining room chairs.


Now, this is a piece of furniture I'm happy to look at again!


Thursday, October 6, 2016

Nightstand Makeover - Again

I'm back with another series of furniture refinishing posts. If you've been a long time reader of Craft A Spell, you may have seen my original posts: the nightstand makeover, the desk makeover, and the side table makeover. These all happened right before I moved into my first apartment in April 2013. Not long after, I realized I had made a horrible mistake: I used an oil based polyurethane over latex paint that ambered horribly. I blogged about it here.

Well, it's only taken me three years to fix it. When I moved into my new apartment in April this year, my patience with the yellow furniture was wearing thin, especially since with the new layout of my apartment, I could see the desk (before it was in a little nook that had low light where I could ignore it). Over labor day weekend, I bit the bullet and bought the paint after seeing a post from one of my favorite blogs, Domestic Imperfection, about a water based polyurethane she uses that doesn't yellow.

I did everything at the same time inside my little apartment (it was a mess for a few weeks) but we'll start with the nightstand. Here's what I used:
  • Kilz original oil based primer
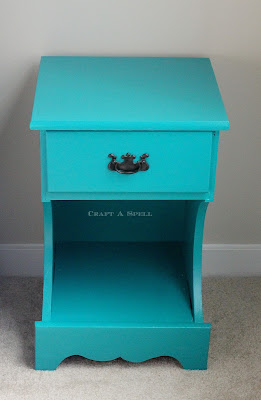
  • Behr Premium Plus Ultra Interior Satin Enamel in Mystic Turquoise 
  • Varathane No Odor Interior Water Based Polyurethane Satin Crystal Clear (ordered on Amazon)
Here is what the nightstand looked like before.


I sanded the nightstand lightly to rough up the surface and give the primer something to cling to. I put on one coat of primer and then three coats of the Behr paint (sorry no pictures of the different stages). Then I covered the top with three coats of the polyurethane per the instructions. Here's how it came out.


It's actually darker in person but the color photographs weird. I am very happy with it and the oil rubbed bronze handles still look great! I'm feeling pretty hopeful I won't be writing an angry follow up post in six months because the reviews on Amazon for the polyurethane were great!


As a reminder, here is what they originally looked like before I made them over:


Here is what they had looked like before it yellowed:


Monday, October 3, 2016

Reupholstered Dining Room Chairs

I've been talking about reupholstering my dining room chairs for ages. I just never made a move on it because I had no idea what type of fabric I wanted and wasn't sure exactly how to do it. After years of blog readings and seeing a number of people do it, I had an idea in my mind but it almost seemed too easy. Just unscrew the seat and staple fabric on? No way. Well, it turns out, yes way.

Here is what my dining room chairs looked like before. They're part of a set of six chairs and a matching table that belonged to my great-grandparents (my mom's mom's parents). We call it the farmhouse set because it's from their farmhouse in South Carolina.


The chairs were covered with an old brown leather that was the exact same color as the stain on the chairs. I'm pretty sure it was original as there was no fabric on the leather when I removed it. At the least, it has been on there since my mom inherited it thirty plus years ago.


I went to Jo-Ann Fabrics with my mom who was planning to reupholster a wing back chair (more on that later). We spent an hour or two just looking at all of the upholstery fabric and going back and forth. I finally settled on this (which was actually the first one that attracted me). I got it for just $11 because it ended up just having enough so I got a remnant price (plus a coupon and they were having a huge sale for labor day weekend).


I'm not doing this as a tutorial because there are so many out there. But, it really was very easy. I had my mom show me how to do the first one and then I did the rest myself. I'm really happy with how they came out!


The new fabric automatically brightens the chair and makes it look more modern.


I was worried I might stop liking the chevron after not too long but it was so easy to do, I can just do it again the next time I get tired of it!

Monday, August 22, 2016

Home Sign [Maryland Edition]

It's always sad when a friend moves away. One of my friends from my last job decided to give life in another state a try - and not just a short move away to Virginia like I did. She headed down south but before she left, I wanted to give her a token to remember her home state of Maryland.

I tried to find something to get on Amazon and came across all these cool wooden signs, pillows, and cutting boards that showed the outline of Maryland and the word HOME, usually with a heart for the 'o'. But, they were all either too expensive or would take too long to get here. So I busted out my trusty Silhouette and made something myself.

I found an outline of the state of Maryland that I liked (Silhouette tip - whenever I make my own images, I just Google what I'm looking for with 'coloring page' at the end. For example, 'Maryland coloring page'. The simpler outline of a coloring page makes it really easy for the Silhouette to find the edges you want).

I created the file and used half of a 5x7 card to cut it on. It came out like this.


Then I played around with some watercolors on scrapbook paper so she'd have options to choose from. On one side was red glitter (a color from the Maryland flag).


 On the other side, I did some watercolors.


I wasn't a fan of it so I made some other options on another set of 5x7s. A splattered watercolor: 


 And an ombre stenciled watercolor:


I gave her all four so she could choose which one she liked best. As a standalone, the first watercolor was my least favorite but as soon as I put it in the frame, I loved it.


I got this frame for a few bucks (with coupon!) from Michaels.


I thought it would look nice in her new apartment or at her desk at her new job. I wanted to make sure it was small enough so it wouldn't take up too much space.


This one was my favorite as a standalone and probably my least favorite in the frame. I think it was just too much white.


Which one do you like best?