

I hope this tutorial provides you with less frustrations than what I went through. May you not mutter as many curses as I did.
1. On the Blogger home page (where you log in) click your blog title. This will bring you to your blog overview page. On the left hand side, hit Settings. Under publishing you will see, + Add a Custom Domain. (Since I have already done this through Craft A Spell, my screen shots will be a mix from another blog I have called Dianna the Explorer and Craft A Spell)

2. Click + Add a Custom Domain. This costs $10 a year through Google (who uses a partner site. My website is powered by GoDaddy). Choose a custom domain and check to see if it's available. Once you find a website that you like, follow the steps to purchase the domain name through Google (you could also purchase a domain name from another host. These are just the steps that I took).
3. After you have purchased your domain, you will get two emails to the address you provided to Google. One will be a Google Wallet order confirmation and the other will be titled something like "Google Apps -- Domain registration confirmation." This is where things started to get confusing and frustrating to me and why I chose to write a tutorial on how to do this.
4. In the second email, there will be a link to create an administrator account for your domain. When you click the link, you will be taken to a page like this.

No matter what you do, or how often you try (well I'm assuming this error is for everyone), you will get an error message that says this.
Server error
We are unable to process your request at this time, please try again later.
This is not your fault! It is a wide spread Google error. I spent hours of frustration waiting for the server error to be resolved before I started looking up what the problem was. After a long time of searching Google forums (BTW, you can't call or email Google for help without having your Google Apps account set up...which you can't access...the reason of which will be explained in a moment), I finally found my answer. Apparently, there is an error where when you create your domain address through Google, it automatically sets up the account called BloggerAdmin. Obviously, you don't know the password since you didn't create it. So you need to go to the following website.
www.google.com/a/cpanel/[yourdomainname].com
Of course, enter your purchased domain name behind the /. For example www.google.com/a/cpanel/diannatheexplorer.com.
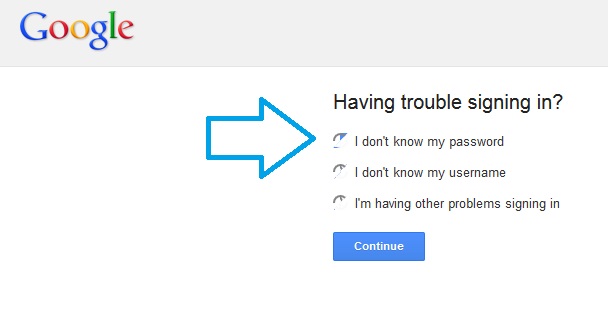
It will ask you to sign in to manage your account. Click Can't Access Your Account?

It will ask you to sign in to manage your account. Click Can't Access Your Account?

Then select I don't know my password. The username is BloggerAdmin@yourdomainname.com.

Google will then send an email to your address on file to reset your password. In the email, click the link they provided and set up a password for yourself.
5. Once you can log in with the BloggerAdmin user (log in at www.google.com/a/cpanel/[yourdomainname].com), you will be directed to a screen that looks like this.

Click on Domains. If you try typing in your new domain, you'll notice it still doesn't work. This is because you need to connect the Blogger blog to your new domain and verify that you own the domain. If you're like me, this will be through godaddy.com. On the Domains Admin Console, click Advanced DNS Settings. You will come to a page like this:


Click on Domains. If you try typing in your new domain, you'll notice it still doesn't work. This is because you need to connect the Blogger blog to your new domain and verify that you own the domain. If you're like me, this will be through godaddy.com. On the Domains Admin Console, click Advanced DNS Settings. You will come to a page like this:

This is your godaddy information. Write down the sign-in name and password and click Sign In to DNS Console.
6. Once you log in, it will look like this.


Click on your newly purchased domain name. On the top of the page, under tools, select DNS Manager.


7. On the Standard DNS Dashboard, click Edit Zone under your domain name. You will be taken to a website that looks a lot like gibberish (if you understand this page, you probably don't need my help). Under the CNAME section, click Quick Add. A new line will pop up like so.


As I said, this is all gibberish to me. I just erased all the lines to be safe.
8. Open a new tab/internet window and go back to the Blogger settings page where you initially started all of this. Again, click + Add a Custom Domain. It will say:
Already own a domain? Switch to advanced settings.
You own a domain now! That's you! Enter your domain after the http:// then click setting instructions. It will take you here:


Click On a top-level domain (www.example.com).
9. Back on the DNS Manager page with godaddy where you entered a new line, follow these instructions. I have blurred out my codes and replaced with letters so you will know where to put the information on the DNS Manager.


Enter the corresponding information into these fields (ie match the text from section A into the spot for A). Then click Save Zone File.


10. Back on the Blogger settings page, enter your domain name again. Click save. If you get an error, wait a few hours and add your domain name again. Sometimes it just takes a while to process the DNS changes.
And you're done! Whew! You did it! Congratulations on your new domain name!
If I missed any steps, please contact and let me know. This was done out of memory after I had already purchased mine.
Thank you for the easy-to-follow tutorial. I would have spontaneous combusted from frustration without your help. Pinning now.
ReplyDeleteI nearly spontaneously combusted myself! I hope it's helpful! I know there are a lot of tutorials out there but some of them are old and none of them have all the steps together. Let me know if you decide to get a custom domain name!
DeleteI'll be following your tutorial after the big move. I'll let you know how it goes. Thanks for sharing at Inspire Us Thursday at Organized 31.
DeletePlease do! I want to make sure I didn't leave anything out.
DeleteVery good and usable post. Thank's to share your experience with us. I will try to remember these tips in my blog commenting task.
ReplyDeleteKitchens Sydney | Flooded Carpet
Wow, what a fantastic tutorial!! Blogger/Google can be very frustrating at times and I feel your pain. But it's so wonderful to have people like you that painstakingly make a wonderful tutorial for the rest of us! Thank you so much for sharing at Give Me The Goods Monday!
ReplyDeleteJamie @ Better With Age
Thanks Jamie!
DeleteI'm about to lose my mind! I've been trying for over an hour to get it to work and I'm frustrated :/ Ive reset my password following your directions but it still won't let me log in even using that BloggerAdmin username and the new reset password. Ahhh! Any ideas for anything else I can do??
ReplyDeleteOh no! No, I'm sorry. That's what worked for me. I definitely feel your pain. I spent a lot of frustrating time with it. I hope you figure it out!! Please let me know if you do.
DeleteYou have provided a richly informative article about domain. It is a beneficial article for me and also helpful for those who purchase the domain. Thanks for sharing this information here.
ReplyDeletedomain name registration